Nutanix Community Edition or CE for short is available for free download from Nutanix and traditionally would be run on some decent hardware. However, for everyone out there with a home or private lab, it’s valuable to be able to nest Nutanix CE on ESXi.
There are several guides out there, but it seems that the more recent editions of Nutanix CE have introduced bugs when nesting on ESXi. My goal is to consolidate all of the information that is required to run Nutanix CE on ESXi 6.5 as of today.
I know that it is not ideal to run Nutanix CE in nested configuration as performance will be affected, but if you don’t have separate compatible hardware available, you are still able to install it and play with it. Where Nutanix Community Edition can work with nested VMware environment.
This post will describe how to install Nutanix CE nested on ESXi.
First of all, we need to register to download Nutanix CE image from Nutanix official website.
Once download completed, we will follow the next steps to build our nested cluster.
Step1
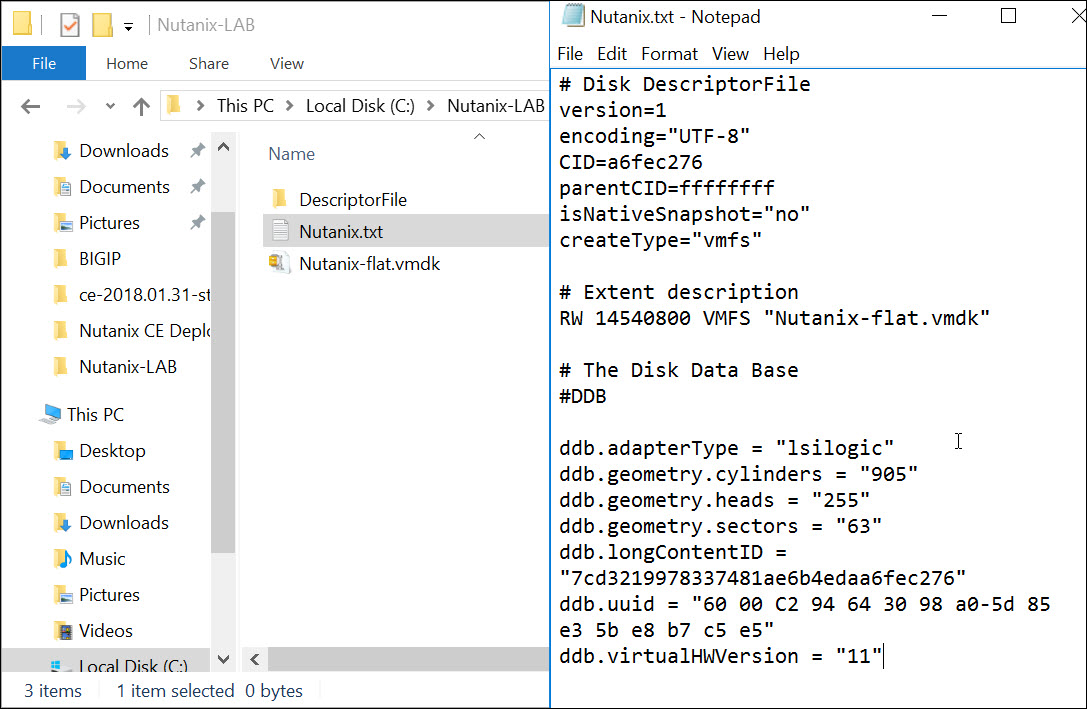
Rename downloaded image and change the extension of this image to be Nutanix-flat.vmdk, or any another name but should add a hyphen then flat.


Step2
Create disk descriptor file by copy it from [popup_anything id=”1330″], and rename the descriptor file to be Nutanix.vmdk
Step3
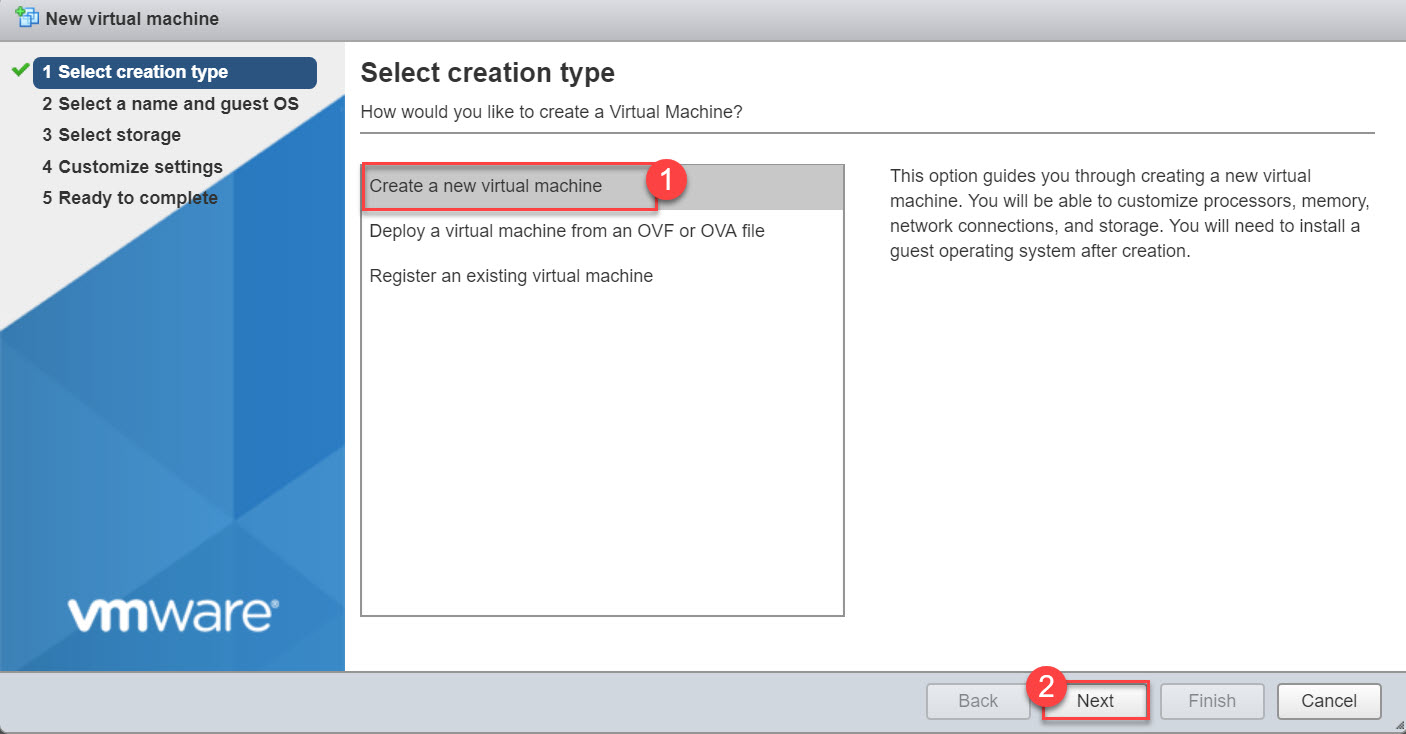
prepare the VM
Select on create a new VM, then click Next.
Choose guest OS to be Centos 4/5/6/7 (64bit)

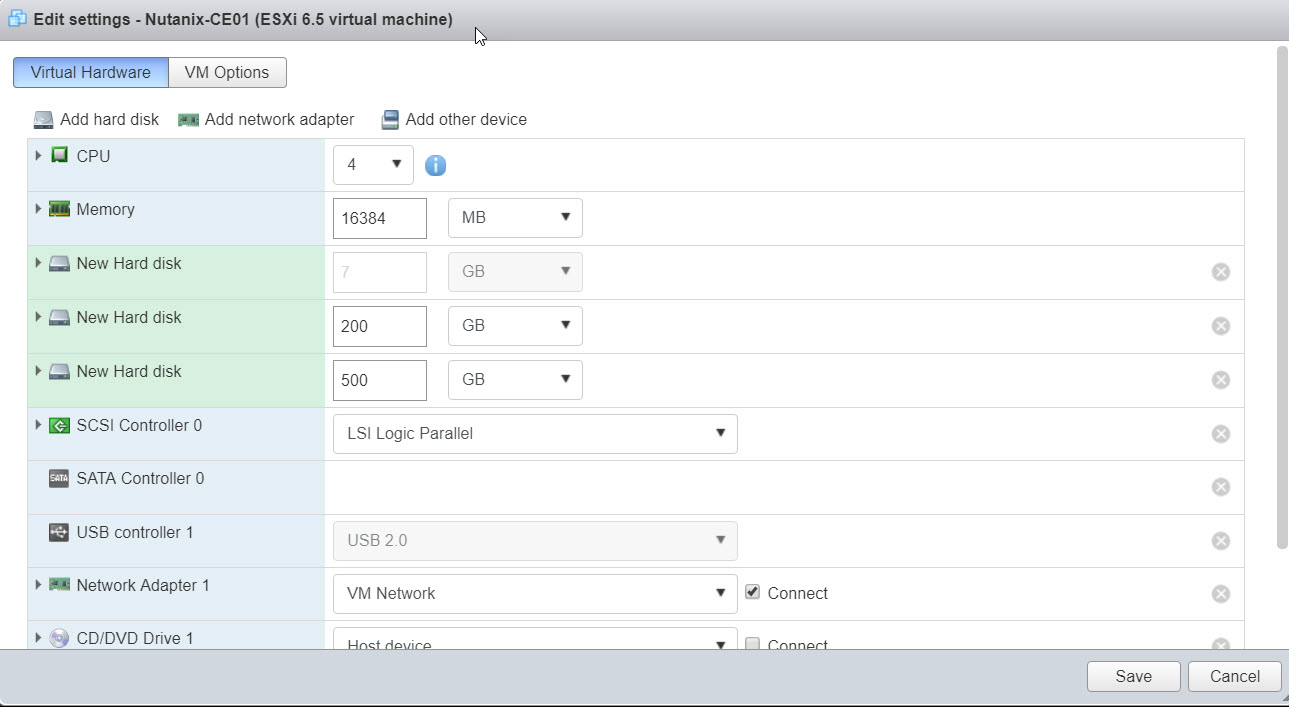
I have selected 4vCPU in my lab, also select Expose hardware-assisted virtualization to the guest OS, since this option allowed nested hypervisors.

I will assign 16 GB of RAM to each node where this is the minimum RAM requirement. Also, I will add two hard drives, the first hard drive is the hard drive, the second is the hard drive, but I will follow the next step to define this HD to be SSD, where I currently do not have SSD hard disk.
500GB vmdk for HDD – map as SCSI0:0
200GB vmdk for SSD – map as SCSI0:1
To define 200 GB HD to act as SSD follow next steps:
Edit settings for the VM, and going to VM Options, then expand the advanced section.
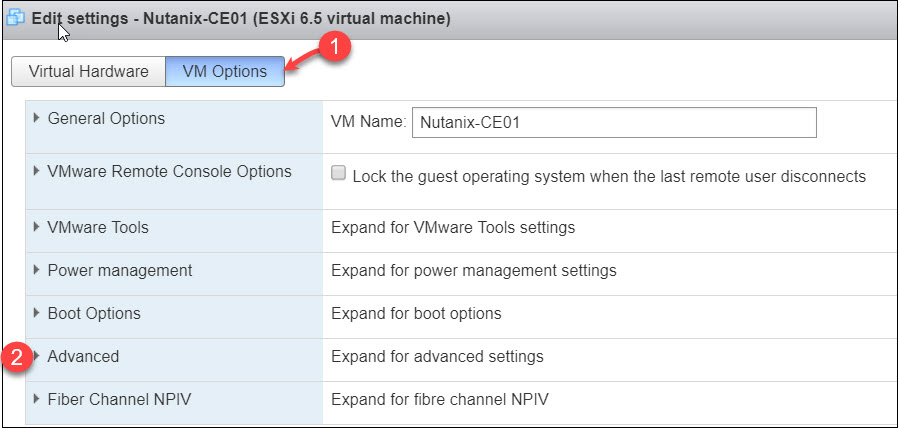
Click on Edit Configuration to add a new parameter to be equal to the following values.
Key : scsi0:1.virtualSSD Value : 1 or True


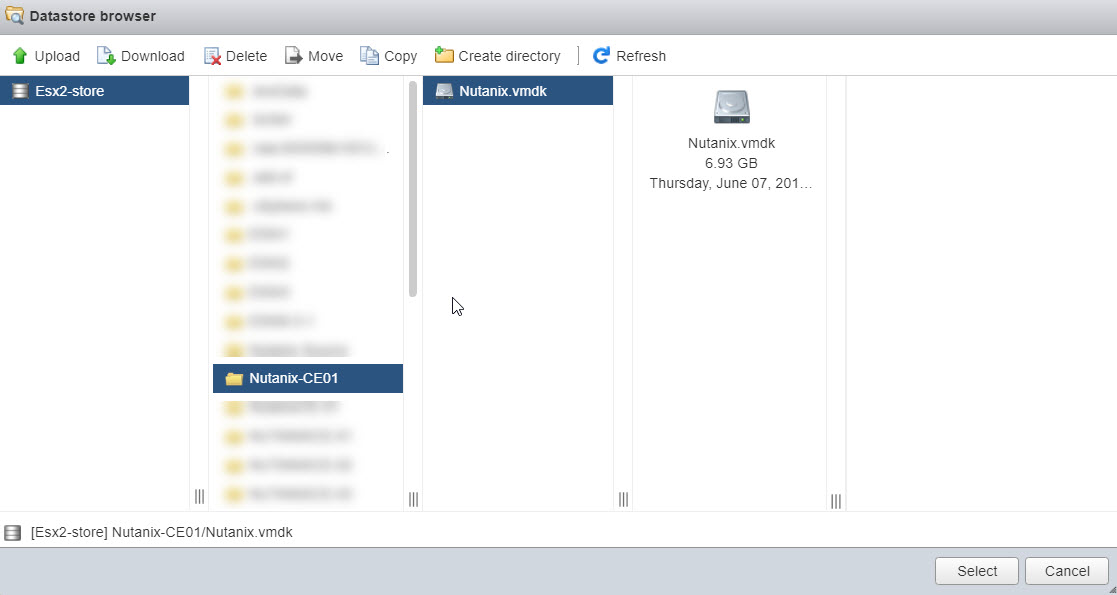
Upload the Nutanix.vmdk which descriptor file & Nutanix-flat.vmdk disk, and add these disks as existing disks to all Nutanix VMs separately.


Now, all required HDD & SSD are attached.
The last step in preparing our lab is enabling ‘Promiscuous mode‘ on the vSwitch or virtual machine network where you have Nutanix community edition VMM connected. Otherwise, controller VM is not accessible.
Starting from Update 03.08.2016 – you may also need to enable ‘Forged Transmits‘.
Before powering on the Nutanix VM, I suggest to clone it to keep a master one to deploy others from the master VM.
Step4
Power on the Nutanix-CE01 to start the installation process.
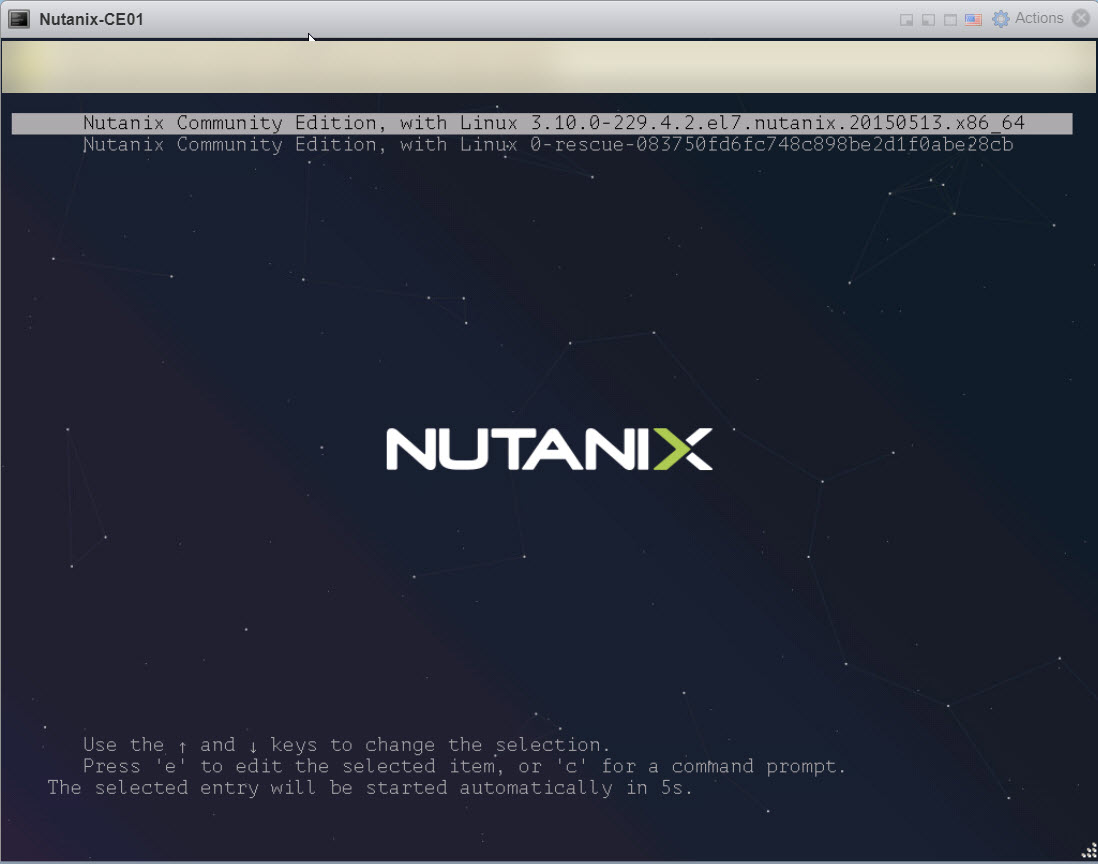
Insert login name (install) without password, with this login name you will going to installation mode.

Select the language what you need and click proceed.

Insert the required IP addresses as below, and please be noted that the first section IP address details it’s for Nutanix node (VM) itself, and the second section it will be for Nutanix CVM (Controller VM).
The CVM IP through it we will build the cluster, and we can access our cluster from accessing any CVM IP.
Configuration of VM1

Configuration of VM2

Configuration of VM3

Step 5 (Configuring Nutanix Cluster)
Open SSH, and insert any CVM IP to start preparing your cluster, here in my lab I logged in to the first CVM.
login name is : nutanix
Password is : nutanix/4u

To create the Nutanix cluster run the following command and add the IP addresses of all CVMs what you need to join to your cluster which should be maximum 4 nodes.
# cluster -s 172.x.x.x,172.x.x.x,172.x.x.x create

You should configure the DNS for your cluster to allow accessing the internet to activate the Nutanix cluster.
# ncli cluster add-to-name-servers servers=8.8.8.8

If you want to change the default cluster name to your own cluster name, just run this command and change the mentioned name with your own name.
# ncli cluster edit-params new-name=XXXXXXXX

After completing the cluster preparation and configuration, try to login through the browser to access your cluster using and CVM IP.
https://172.16.5.130:9440
Default user name : admin
Default admin password : admin

The Nutanix cluster will request you to change the default password as below.

Now the step of activating your Nutanix CE the Nutanix Next portal.
I assume you have an account which you are using to download the Nutanix CE image, just put it here and press Enter.

Once validation completed, now you are ready to use and work with your Nutanix cluster.

Thanks for Reading!
That is really fascinating, You’re a very skilled blogger.
I have joined your feed and look forward to in the hunt for extra
of your wonderful post. Also, I’ve shared your web site in my social networks
Thanks, Male, I will try to add more posts to my blog, I was very busy during the last few months due to difficulties happened with my first baby during his born.
Great article, way better than the other articles I found first on this topic.
Couple of things should be updated for the recent versions (vSphere 6.7, CE 2018.05.01)
– Set the SCSI controller to VMware Paravirtual. LSI Logic Parallel isn’t even detected anymore.
– Recommend deleting the first OS disk, and put the steps about adding the Existing Disk first. That way the disk ordering is correct. Following your instructions I added the existing disk last, which made it unbootable.
– the cold tier disk (500GB should be SCSI0:2 then)
Thanks again for the great article!
Thanks, Irving for your advice, I’ve tried in my lab and found it very helpful with me, thanks again.