In this Part 4.2 of the vCenter 6.7 Deployment series, I will configure the load balancer that will provide a layer of redundancy between the two external Platform Services Controller (PSC) appliances that were deployed in configured in Part 4.1.
F5 BIG-IP DEPLOYMENT
I have downloaded my F5 BIG-IP appliance, and request the license during registration, and now I will proceed with deploying the appliance.
This virtual appliance download as an OVA file, then I extracted it to highlighted files.
- A manifest file (.mf)
- A descriptor file (.ovf)
- a virtual disk-1 file (.vmdk)
- a virtual disk-2 file (.vmdk)

The files I’m going to work with are the OVF and VMDK files. The MF file is an optional file that is used for integrity/authenticity checks. It contains the SHA1 digest for all of the files in the package.
Let’s start deploying the OVF package for the F5 BIG-IP Load Balancer.
Step1 (Deploy F5 BIG-IP Virtual Appliance)
Login to ESXi and click on Create / Register VM, and click on deploy a virtual machine from OVF or OVA file.

Inster virtual machine name, and select ovf, vmdk-1 and vmdk-2 files, then click Next, after that select the destination datastore and click Next.


Click on agree to accept EULA, and click on Next.

Specify the port groups for each interface to manage your appliance.
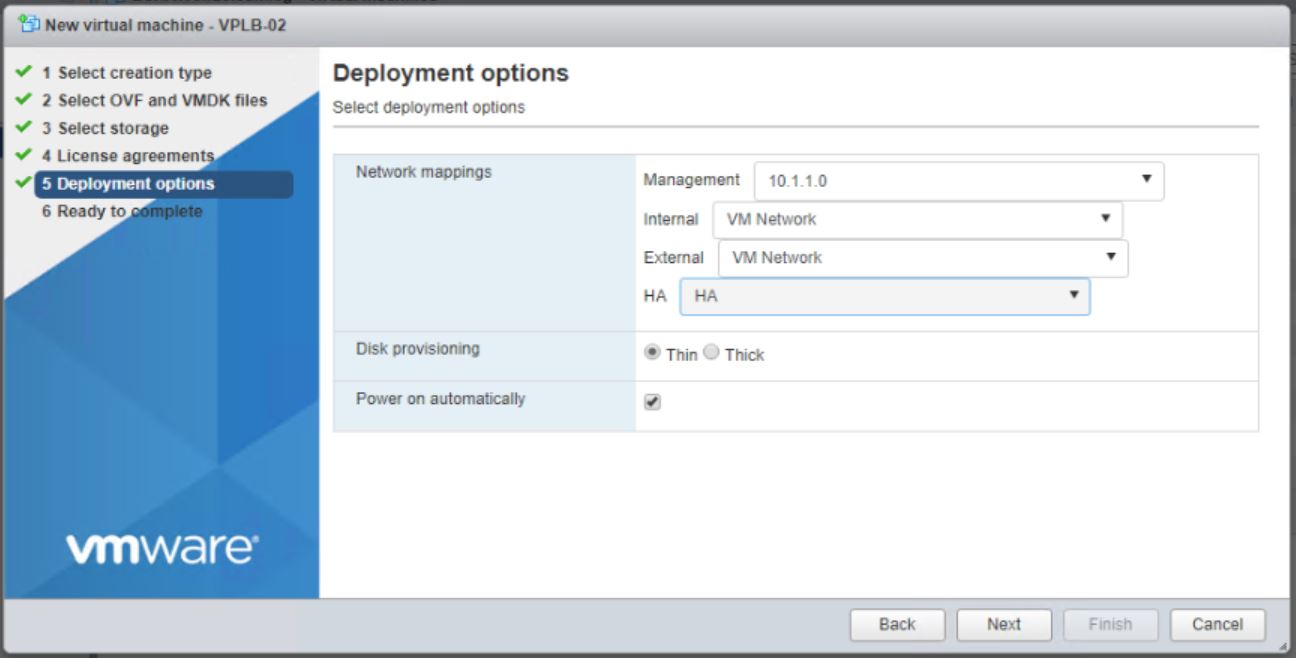
Just Wait for few minutes to complete deployment.

Step2 (Accessing & Activating F5 BIG-IP Virtual Appliance)
After completing the deployment, I’m going to configure the F5 BIG-IP appliance and set mgmt IP to access the appliance from GUI.
Open VM console and follow these steps.
Login to F5 BIG-IP appliance by entering the default username and password:
Username: root
Password: default 
Inster tmsh command to change the configuration mode to advanced mode, and check the mgmt IP address which is the default IP by running this command list /sys management-IP
# tmsh
# list /sys management-IP

Run this command modify sys global-settings mgmt-DHCP disabled to disable DHCP since we are not able to set static IP when DHCP enabled.
# modify sys global-settings mgmt-dhcp disabled

Now, set the new mgmt IP address as you need by this command create /sys management-IP 10.1.1.5/24
# create /sys management-IP 10.1.1.5/24

Now, we can access F5 BIG-IP through GUI (web), just open your browser and insert the IP address and click enter.
Default user: admin
Default password : admin

After logged in now we should go to activate the appliance (we can request a trial license for 90 days from the F5 official website) here in my lab; I’ve requested license already which I’m going to use it to activate the appliance, click Next to start the activation process.

Click on Activate.

Insert activation serial which you should receive it from F5 to your email, and select the type of activation to be manual and click Next.

Just copy the license details, then click to access F5 license server to complete registration of requested serial.

Past the license details inside the selected box then click Next to generate the license file.

After generating the license file copy all details generated and past it inside license box then click Next.
At this moment you activated the appliance for 90 days successfully.

Step3 (Configure F5 BIG-IP Virtual Appliance)
Now, we have to start the configuration step which is most important part of configuring F5 appliance.
First, select on network part and then click Next on the right side to start preparation step.

Prepare internal network by specifying IP address in the internal network, assign VLAN interface 1.2 and make it untagged as mention below.

Prepare external network by determining IP address in the external or user network, assign VLAN interface 1.1 and make it untagged as mention below.

HA interface will be effective if you will go to join your appliance to failover mode.

After that, enter NTP, DNS servers, then bypass the failover and mirroring steps since we are not going to configure failover in our scenario.
Finally, finalize the preparation step by clicking on Next then finish in standard pair configuration step, now F5 appliance ready to load balancing any service we need.

Step4 (PSC HA by F5 BIG-IP Load Balancer)
1. Create a VLAN
Navigate to Network > VLAN > VLAN List > New VLAN (Create).

Provide a Name.
Under Resource > Interfaces, move Interface 1.1 to Untagged using the Add button. (Already created during preparing F5 in step 3)
Click Finished.


2. Configure the Interfaces
Navigate to Network > Interfaces > Interface List.
 Select 1.2 and 1.3.

Click Disable.Note: These steps only using one Interface. You may require more than one active Interface.

3. Configure the Self-IP

- Provide a Name.
- Enter the IP Address and Netmask for the Self-IP.
- In the VLAN/Tunnel section, select the VLAN created previously.
- In the Port Lockdown section, select Allow Default.
- Click Finished.
Note: The Self-IP cannot exist on the same subnet as the F5 Management IP.

4. Create PSC Service Monitors
Navigate to Local Traffic > Monitors > Create.

Provide a Name, and select Type HTTPS.

- Set an interval of 30 Seconds.
- In the Send String field enter:
GET /websso/HealthStatus HTTP/1.1\r\nHost:\r\nConnection: Close\r\n\r\n
- In the Receive String field enter 200.
- In Alias Service Port enter 443.
- Select Finished.

Navigate to Local Traffic > Monitors > Create.

- Provide a Name.
- Select Type TCP.
- Set an interval of 30 Seconds.
- Leave the Send String field empty.
- Leave the String field empty.
- In Alias Service Port enter 389.
- Select Finished.


- Provide a Name.
- Provide the IP Address of the First PSC Node.
- Under Health Monitors select Node Specific.
- Move icmp and PSC-Monitor and PSC-Monitor1 to the Active column.
- Click Repeat

- Provide a Name.
- Provide the IP Address of the Additional PSC Node.
- Click Finished.
- Repeat the preceding steps for additional PSC Servers.

After completing Create Member Nodes, we can see our PSC nodes active as below.

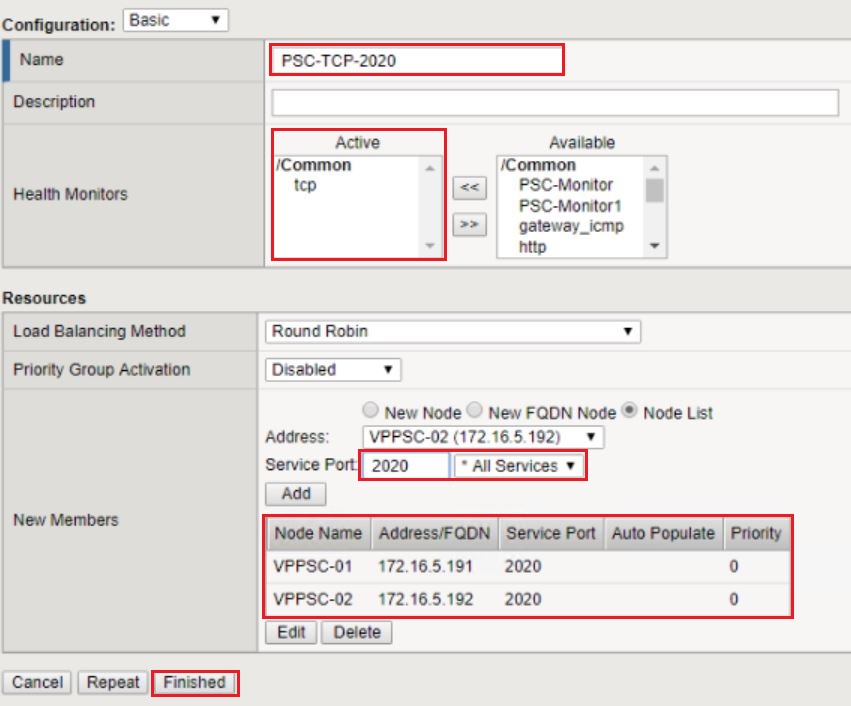
Navigate to Local Traffic > Pools > Pool List > Create.

- Select Basic configuration type.
- Provide a Name.
- In the Health Monitors field, move tcp to the Active column.
- In the Load Balancing Method field, select Round Robin.
- In the New Members field, select Node List.
- In the Address field, select your First PSC Node.
- In the Service Port field, enter 443.
- Click Add.

- In the Address field, select your additional PSC Node.
- In the Service Port field, enter 443.
- Click Add.
- Click Finished.

Repeat preceding steps for ports 389, 636, 2012, 2014, 2020.


7. Create a Persistence Profile
Navigate to Local Traffic > Profiles > Persistence > Create.

- Provide a Name.
- Select Persistence Type > Source Address Affinity from the drop-down menu.
- Select Custom.
- Enable Match across services.
- Specify the Timeout value to be at least 28800.
- Click Finish.

8. Creating the Virtual Server IP (VIP)
Navigate to Local Traffic > Virtual Servers > Virtual Server List > Create.
/0-.jpg)
- Provide a Name.
- In the Destination Address field, input the Virtual IP to be used for the Load Balanced PSC FQDN.
- In the Service Port field, enter a value of 443.
/1-VIP-443-1.jpg)
- In the Source Address Translation field, select Auto Map.
/2-VIP-443-2.jpg)
- In the Default Pool field, select the Pool for 443 created previously.
- In the Default Persistence Profile field, select the persistence profile created previously.
- Click Finished.
/3-VIP-443-3.jpg)
Create the VIP for remaining ports 389, 636, 2012, 2014, 2020.
/4-VIP-389-1.jpg)
/5-VIP-389-2.jpg)
Now, we have created VIP,s successfully.
/6-finish.jpg)
- Navigate to Local Traffic > Network Map.
- Ensure that Each VIP contains the correct Pool and that the correct Pool contains the correct Node: Port assignment.

Thanks
QUICK LINKS
- VCENTER 6.7 DEPLOYMENT & TOPOLOGY – OVERVIEW (PART 1)
- VCENTER 6.7 DEPLOYMENT – EMBEDDED PSC (PART 2)
- VCENTER 6.7 DEPLOYMENT – EXTERNAL PSC SINGLE NODES (PART 3.1)
- VCENTER 6.7 DEPLOYMENT – EXTERNAL PSC SINGLE NODES (PART 3.2)
- VCENTER 6.7 DEPLOYMENT – EXTERNAL PSC WITH F5 BIG-IP LOAD BALANCER (PART 4.1)
- VCENTER 6.7 DEPLOYMENT – EXTERNAL PSC WITH F5 BIG-IP LOAD BALANCER (PART 4.2)
- VCENTER 6.7 DEPLOYMENT – EXTERNAL PSC WITH F5 BIG-IP LOAD BALANCER (PART 4.3)
I’ve been surfing online more than 4 hours today, yet
I never found any interesting article like yours. It’s
pretty worth enough for me. Personally, if all web owners and bloggers made good content as you did, the net will be much more useful than ever before.
This is a topic that’s close to my heart… Take care!
Where are your contact details though? I wanted to thank you
for this excellent read!! I certainly loved every bit of it.
I’ve got you book marked to check out new stuff you
I have been browsing online more than 3 hours today,
but I by no means found any fascinating article like yours.
I know that my response to you came to you very late, but I was too much busy due to difficulties with my first baby after he’s born.
I appreciate your gentle words.